DataMagic Technical Column〈DataMagic Manager Installation〉
Introduction
DataMagic Manager is a GUI tool for using DataMagic. Using DataMagic Manager makes remote operation and management easier, improving operability. (DataMagic Manager is a tool that comes with DataMagic device itself.)
How to install
Step 1 - Start the setup program
DataMagic is installed using the setup program.
- >Starting the setup program and language settings
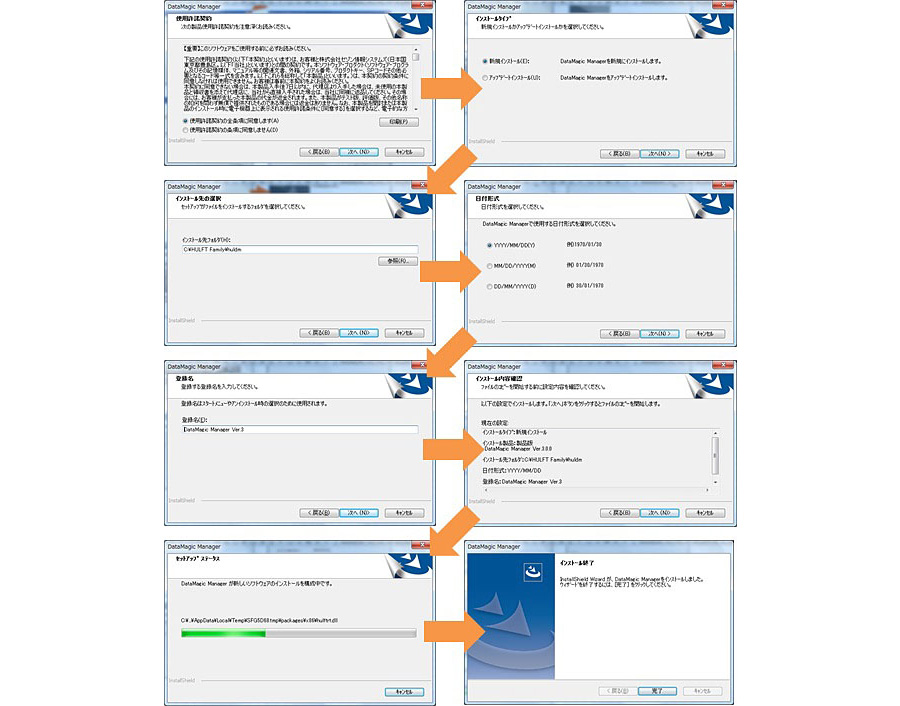
Run Setup.exe in the downloaded module. Select your language and click the [Next] button.
Step 2 - Run the installation
If the serial number is entered correctly, DataMagic Manager License Agreement agreement will be displayed. Read License Agreement agreement, accept License Agreement terms, and click the Next button.
- Selecting Installation Type
If you are installing DataMagic Manager for the first time, select "New installation" and click the "Next" button. - Setting the installation folder
If you want to change the installation folder, click the [Browse] button and change the folder. After deciding on the folder, click the [Next] button. - Setting the date format
Set the date format to be used in DataMagic. After deciding on the date format, click the [Next] button. - Registered name setting
Set the registration name that will be displayed in the Start menu and "Change or Remove Programs." (*Default value: DataMagic Manager Ver.3) After entering the name, click the [Next] button. - Verifying the installation
After checking the installation details, click the [Next] button. The installation process will begin. When the installation is completed successfully, the installation completion screen will be displayed. Click the [Finish] button to exit the setup program.
Step 3 - Configure the connection host
To connect to the host where DataMagic is installed, you will need to set and register the necessary information.
- Launching DataMagic Manager
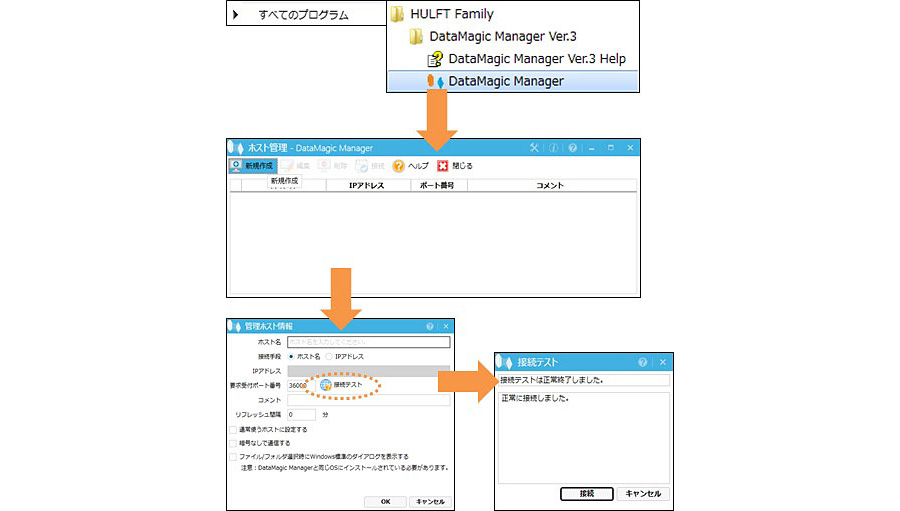
From the Start menu, click All Programs, then click HULFT Family, DataMagic Manager Ver.3, and then DataMagic Manager. - Display the management host information setting screen
From the DataMagic Manager screen, click [File] menu, [New], and then [Destination Host]. - Management host information settings
Register the connection information.
Host name: Any name to identify the destination host
Connection method: Select either host name or IP address
IP address: When connecting by IP address, specify the IP address of the destination
Request reception port number: DataMagic request reception port number of the destination host (default: 36000)
Refresh interval: Set when automatically updating each screen - Connection Test
After registering the connection destination information, perform a connection test. Click the [Connection Test] button on the management host information screen, and when the connection test screen appears, click [Connect]. Verify that the connection confirmation test is completed successfully.
Step 4 - Connect to DataMagic
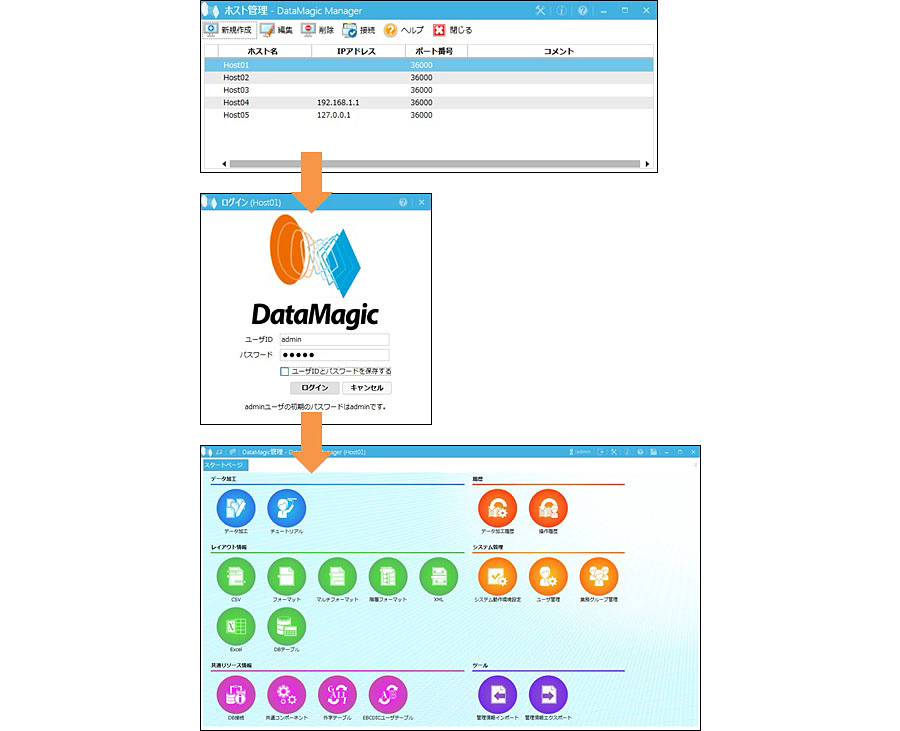
A list of registered host information is displayed on the DataMagic Manager screen. Double-click the host name you want to connect to to display the login screen.
- When you first log in, log in as "admin," which was set when you installed DataMagic.
Once you have logged in, DataMagic management screen for the connected host will be displayed.
lastly
Using DataMagic, you can easily create processes such as code conversion between different types of machines, data cleansing, and utilizing data stored in a database using a GUI.
Please download DataMagic trial version and take advantage of future technical columns.
- The trial version is free to use for 60 days.
- After you sign up for the trial version, you will receive 90 days of free technical support.
DataMagic Column List
- DataMagic Manager Installation
- "DataMagic" is recommended for its "fast, cheap, and easy" features.
- Vol.1 Character code conversion: EBCDIC⇔Shift_JIS
- Vol.2 Character Code Conversion: External Character Codes
- Vol.3 Character Code Conversion: Unicode (UTF-8)
- Vol.4 Data Conversion: Pack⇔Zone Edition
- Vol.5 (Fixed length ⇒ CSV data conversion)
- Vol.6 (Special Edition) HUB+ DataMagic Collaboration Case Study
- Vol.7 <Distribution BMS ⇒ CSV Conversion>
- Vol.8 <Matching Processing>
- Vol.9 (Full-width⇔Half-width Conversion)
- Vol.10 (DB table data extraction)
- Vol.11 Data Correction
- Vol.12 〈String Replacement〉
- Vol.13 (Special Edition) DataMagic Implementation Case Studies
- Vol.14 (Data sorting and file division)
- Vol.15 Data Collection
- Vol.16 File Merging
- Vol.17 HULFT Definition Bulk Registration
- Vol.18 (Special Edition) HULFT-WebFiletransfer + DataMagic Integration Case Study
- Vol.19 (Introduction Case Studies) Our company's use cases
- Vol.20 Data Masking
- Vol.21 (DB Migration Edition)
- Vol.22 <Common Components: EBCDIC Code Replacement>
- Vol.22 Appendix <Common Component Import and Execution Procedures>
- Vol.23 <Common Components: Date Conversion Function Extension>
- Vol.24 〈Resolving customer requests!: Common components that can process data even if there is invalid data〉
Related Content
-

Why are SoR and SoE separated? – Solving the operational challenges of "bimodal IT" through data integration.
-

I always find the "Yamazaki Spring Bread Festival" interesting in many ways – the possibilities of "adding a little something extra."
-

How to use generative AI to translate survey analysis into next actions